
Any idea, yes we can also create our own rule to visualize the data in Excel.


IF Count of range(B3:B10) is equal to Count of range(D3:D10), here if Equals to condition is satisfied then the status is TRUE else status is FALSE.
Steps:
You can apply the rule the way to expect the result.
Hope you found the useful, you can try to get the result as per your need.
Subscribe by email for latest updates, keep learning..
Download Conditional Formatting with Rule example workbook and learn.
Subscribe YouTube Channel EXCEL FUNCTION
In last article Conditional formatting in Excel we have seen some in-built methods as to we can apply Conditional formatting to our data.
Still we can use in-built conditional formatting and highlight higher/lower/outlier figures in our data, making use of formulas we can also build our own dynamic conditional formatting rule and apply all over our data.
I have been using formula conditional formatting for quiet long time. Found very useful as we can apply customized formatting at time of analysis, developing interactive dashboards.
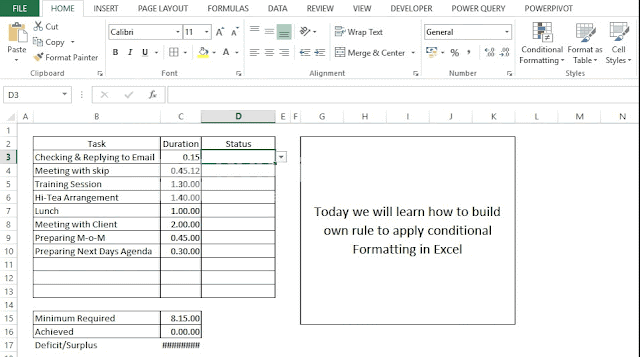
Today we will learn something quiet simple method to apply formula and build our own rule in conditional formatting.
In excel by entering command Alt HL, we see Conditional formatting wizard. And on entering Alt HLN we see another wizard named "New Formatting Rule" as shown below.

Once you get the "New Formatting Rule" wizard, you can rule the concept of visualizing the data the way you and audience wants to see. I have an example where we will try to learn how to create rule with help of formula.
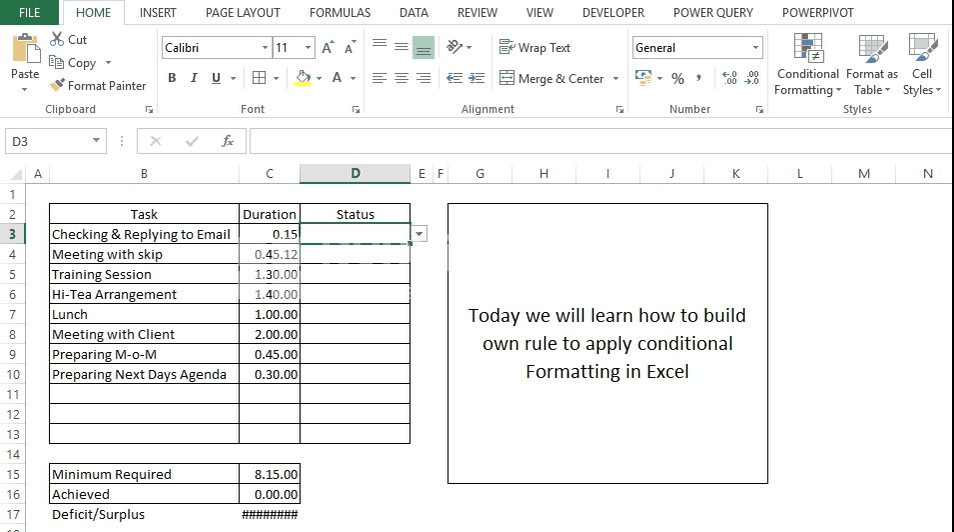
In this example, I'm trying to highlight or confirming that if any of the listed task are open, the final status should be not achieved and if all the tasks are closed in stipulated time frame, I will have to update the status as Closed against each task. Finally I must get the final status as "Achieved" with highlighted "Green" in color.
Now let us understand the formula used to build this condition. The simple logic that I applied in this formula is to check the number of Task and number of Status are equal, if so than in cell D15 I must get the value as "Achieved" with green background. To check the counts of both columns I used COUNTA function that counts all the non-blank items in specified range.
=IF(COUNTA($B$3:$B$10)=COUNTA($D$3:$D$10), TRUE, FALSE))
IF Count of range(B3:B10) is equal to Count of range(D3:D10), here if Equals to condition is satisfied then the status is TRUE else status is FALSE.
Steps:
- Press Alt HLN to get Wizard pop-up in front of you.
- Select on Select Rule Type wizard, select "Use formula to determine which cells to format" from the list.
- In Edit Rule Description box write the above formula, where we want to determine as to all tasks are closed.
- Click on Format button downward right side to format the cells, here you can change background color, Font name, size, color or even you can apply borders.
- Once you are done with all above activity.
- Click OK for three times and check the result.
You can apply the rule the way to expect the result.
Hope you found the useful, you can try to get the result as per your need.
Subscribe by email for latest updates, keep learning..
Download Conditional Formatting with Rule example workbook and learn.
Subscribe YouTube Channel EXCEL FUNCTION


No comments:
Post a Comment